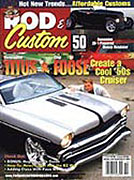
Nothing Shocking
Can Rewiring Your Ride Really Be EZ? You Bet By Damon LeeRod & Custom Magazine
Does the word electron intimidate you? Do your eyes glaze over when people start talking about voltage, amps, or direct current? Does the term butt connector make you giggle uncontrollably? Well, don't fret, you're not alone. If nothing else, the ROD & CUSTOM staff is right there in the same boat with you.
Fact is, most hot rodders are unfamiliar with electricity. The good news is that it doesn't matter. Over the past dozen years or so, the street rod aftermarket has done an excellent job of simplifying automotive wiring. These days you can choose from any number of do-it-yourself wiring harness kits, all of which are designed to make rewiring a straightforward--dare we say, easy--process. You no longer need to be an electrical genius to tackle the job. In fact, you don't even have to know how or why all the stuff works. All you really need is to be patient and follow instructions to get the job done in a tidy, professional manner.
Skeptical? Hey, that's understandable. To set your minds at ease, yours truly was assigned to do this story. You see, prior to this, my automotive electrical experience was limited to installing a few stereos and other basic accessories. Rewiring an entire car was as new to me as I'm sure it is to many of you.
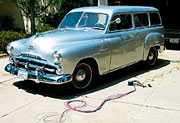
The guinea pig for this experiment was my '51 Plymouth wagon, which turned out to be a great candidate. As you might expect, 50-plus years of service and exposure had left the original cloth-covered wiring in questionable shape. Everything was still functioning (most of the time), but there were bare, frayed wires everywhere, not to mention funky splices and creative connections administered by the previous owner. To top it off, the car was still running on a positive-ground 6-volt system, and I wanted to convert to 12-volt negative-ground to take advantage of newer accessories and a possible drive train swap in the future. Upgrading to fresh wiring and a modern fuse panel seemed like a good idea.
The wiring kit for this project came from EZ Wiring and, as the company name implies, was designed with the do-it-yourself hot rodder in mind. EZ Wiring actually offers several styles of pre-wired fuse block kits, along with a variety of electrical accessories (plugs, switches, etc.). We elected to use the company's new EZ 20, a 20-circuit kit with a compact fuse panel designed for cars where space is at a premium. Even though the Plymouth isn't exactly short on space (especially compared to, say, a Model A roadster), the idea of a compact panel was still appealing.
Like many aftermarket wiring kits, the EZ harness uses a GM-style color coding system (kits with all-black wires are also available), and each wire is labeled every 5 inches to simplify installation. The ignition and headlight switch wiring are also designed to plug right into GM-style switches. The kit comes with the necessary flashers, a horn relay, GM-style column connectors, and the most important accessories, instructions and diagrams.
All told, the installation went quite smoothly--a little time-consuming and tedious, perhaps, but that's the nature of wiring. The biggest hangups came from working on a "finished" (or assembled) car, which meant maneuvering around obstacles, cramming my hands (and sometimes body) into tight spaces, and taking time to move and remove parts (interior panels, sill plates, carpet, etc.) to route wires where I wanted. Retaining the Plymouth's stock switches and instruments also presented a few challenges, but nothing that couldn't be overcome with a little rodding ingenuity (and by consulting the OEM electrical diagram in the car's service manual).
Wiring may not be the easiest or most fun part of a hot rod or custom car project, but it's always necessary, so you might as well learn to do it yourself. In addition to saving money and gaining a sense of accomplishment, you'll become a lot more familiar with your electrical system, making it easier to troubleshoot in the future. Even if you're not an electrical genius when you start, you may just feel like one when you're finished.
This rewire also involved a 12-volt conversion, which meant replacing the generator with an alternator (a 12-volt generator could have been used, as well). Adapting the alternator to the generator brackets was fairly simple. I "kept it in the family" with a Mopar alternator; in retrospect, a GM unit might've been easier.
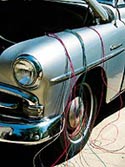
Deciding how to route the harness can be the most time-consuming chore, especially if you're trying to hide the wires. Keeping things tidy with zip-ties and clamps is particularly important if the wires remain visible, as they are here. Wrapping the harness with black tape or split loom sometimes helps it disappear--just stay away from the neon pink sheathing, please.
The supplied headlight plugs can be spliced into the harness after routing the appropriate wires to their respective buckets. Don't forget to ground the ground wire.
Since turn signals were being added, I replaced the original single-contact park lamp pigtails with double-contact units from the parts store. In some cases it might be easier to replace the bulb receptacle altogether.
Working fore to aft, the dash section came next. Again, this section was divided into subgroups based on destination. If you're using aftermarket gauges, you may find it easier to wire them individually on a bench and connect them to the harness using a multi-pin plug. This will make it easier to disconnect the entire cluster for removal or service.
The EZ Wiring harness is pre-wired with GM ignition switch plugs. I opted to retain the Plymouth's original switch. Wiring it up meant cutting off the plugs, crimping on bullet-style terminals, and referencing the Plymouth's factory service manual to make the correct connections.
Same story on the headlight switch. It just took a little diagram deciphering to properly plug wires into the original switch.
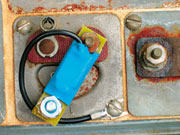
Most of the Plymouth's instruments are mechanical, so they were unaffected by the 12-volt conversion. The only exception was the electric fuel gauge. A simple "Runtz" voltage drop unit from Fifth Avenue Antique Auto Parts will keep it working properly.
Turn signals may have been optional in 1951, but they are mandatory if you fight freeway traffic on a daily basis. This add-on switch from Speedway Motors made mine operational.
One trade-off with the EZ 20's compact fuse panel is that you have to find a place to mount the flasher units. I used a simple hardware-store clamp (designed for hanging rakes and brooms) to secure the turn signal flasher to the firewall.
Routing wires under the carpet is one way to get them to the rear of the car. Just avoid high-traffic areas and obstacles like seat mounts. Fanning the wires out flat and securing them with duct tape will prevent the dreaded lumpy carpet syndrome.
In my case, the Plymouth's door sill pad provided a channel for the wires to run through. From there, the wires were routed behind interior panels to the rear of the car and their respective destinations.
SIX TO TWELVE
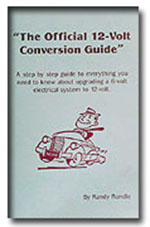 As mentioned in the text, my rewiring adventure also involved converting the Plymouth over from a 6-volt, positive-ground Conversion guide system to 12-volt, negative ground. There is not enough space to adequately address the topic here, so I will recommend the 28-page tome I used as a crib sheet -- "The Official 12-Volt Conversion Guide", by Randy Rundle. Meanwhile, here is a quick-hit list on this particular conversion:
- Replaced the generator with an alternator
- Installed a 12-volt voltage regulator.
- Swapped the 6-volt starter solenoid for a 12-volt unit.
- Replaced the 6-volt coil with a 12-volt coil.
- Changed all 6-volt bulbs to 12-volt.
- Installed a voltage-drop unit (Runtz) on the fuel gauge.
- Reversed wires on the amp gauge (so it will read correctly with a negative-ground system).
- Installed a 12-volt battery (sounds obvious, but you never know!).
- The car currently has no heater, so I did not have to worry about the blower motor. The wiper motor will be replaced with a 12-volt, negative-ground unit.
TOP 10 WIRING LESSONS
- Measure twice, cut once.
- Read the instructions. Twice.
- Wiring harnesses are like old cars--they usually need to be customized to fit your needs.
- Pulling on the wires won't make them longer.
- Measure twice, cut once.
- You'll wish you had swinging pedals after wedging your neck between floor-mounted brake and clutch pedals while lying on your back under the dash.
- Face it, the street rod world is Chevy biased. Wiring is easier when you use GM-style switches, columns, and alternators.
- Zip-ties are your friends.
- We don't care about your adult-onset attention deficit disorder--finish one section before moving on to another.
- Measure twice, cut once.
Fifth Avenue Facts
Randy designed and built the first 6-volt alternator in 1987. Up to that point there was no such thing as a 6-volt alternator, only modern 12-volt alternators were available.